Showing posts with label Eyeliner. Show all posts

Sunday, 11 August 2013

Hype


A face of the day post for ya'll today. I recently caved to the Illamasqua summer sale and bought 'Hype' an acid yellow eyeshadow with a matte finish. I'm aiming to increase the colour range in my kit, but couldn't resist trying it out on myself first!

I used Benefit's 'Stay Don't Stray' eye primer, two brown shades from the Urban Decay Naked Basics palette, and Illamasqua 'Hype.' I smudged MAC Kohl in 'Smoulder' underneath my bottom lashes, and added some falsies, finishing off with a slick of black gel liner. Totally over the top, but it was fun, and I am surprised by how much I liked yellow!

Blogging is going to be a wee bit absent for the next week, as I don't have a day off now until next Sunday on which I am sure I will be gently rocking myself back and forth in a corner, in blankets, with my phone turned off, catching up on BINTM or some shizz. Then I am off to London for a few days but hope to get a couple of posts sorted for then. All the best til then.


Thanks for reading,

E.

Saturday, 20 July 2013

Iggy Azalea inspired; Tuxedo Eyeliner


Thought I'd try out 'Tuxedo Eyeliner' after spotting it on the video of one of my favourite songs this year so far- Iggy Azalea Work. It has been non stop in our household, let me tell you that. Though did anyone else hear her interview on Radio 1 last Sunday? Talk about bland.

To create this look, it is quite straight forward but does take a bit of time and does need a steady hand. I chose a soft smokey eye as a base, main colours used were my Urban Decay Naked Basics palette (couldn't be without it) and Daniel Sandler eyeshadow in 'Tornado' (review to come on that one soon.) I first lined and winged my eyes, following the eyeline using MAC 'Blacktrack' gel liner and a thin brush. Secondly I followed the line on top using Illamasqua's liquid eyeliner in 'Scribe'- a pure white. A bit watery at first, this does need two coats to be opaque. After that had dried, I re-lined the black line, to correct any bleeds and to deepen the colour. 
Followed with lashings of mascara and my base makeup as usual, the look was done. Probably not the most wearable, everyday looks but I haven't done anything for just a bit of fun in a while. I've been so bogged down with bridal trials and wedding days (not that I'm complaining, I love what I do) that I was itching to try something a bit creative!!


Let me know what you think. Thanks for reading,


E.

Tuesday, 2 July 2013

Daniel Sandler Waterproof Eyeliner Review

Daniel Sandler Long Lasting Waterproof Eyeliner in 'Purple Velvet', £9.24 for 0.35g here.


I was really looking forward to trying my first ever Daniel Sandler product. The makeup line is quite highly regarded and I've not read any negative reviews myself. I have been itching to try the Watercolour blush for years now and when my budget allows it, I know I'll be stocking up on a few.

'Purple Velvet' on the stock photo looked so vivid and beautiful. I had visions of a shock of purple blended into water and lashline, great for emphasising green eyes and something a bit different to what I am usually reach for. On first swatch I noticed that the purple is actually a deep aubergiene colour, perhaps a more sophisticated version of the electric purple I was expecting. It has fine silver glitter running through it and became opaque on my hand after three swipes.
The colour pay off is quite weak on my eyes in comparison to other pencils I own, I found I had to work quite hard for the colour to show up well, as the product seems more suitable for a slight wash of colour/liner rather than anything vivid or intense.  I had terrible trouble trying to apply this to my waterline, I got absolutely no colour pay-off after rubbing it on there several times before giving up. Slightly disappointing, but as this liner doesn't claim to be a 'kohl' I cannot be too disappointed and it shouldn't affect my review.

The liner can be quite easily smudged and softened, something quite unusual in a waterproof  product as they are normally a lot more stiff in consistency. This is an element to the liner that I really like. For me this works better as an eyeshadow crayon, something to be worked into a smokey eye or smudged to create a purple wash of shadow. Due to it's twist-up mechanism, the pencil can't be sharpened which I find also lends itself to being used as an eyeshadow crayon because it is hard to get a precise finish after it has been used a couple of times as there is no way to sharpen it.

In terms of it's waterproof claims, it performs quite well. I wore it on a 2k jog, which although isn't a long or gruelling run, definitely put it to the test. It remained intact with a little fade. Not bad!!

I had high expectations for this but it just doesn't deliver as an eyeliner in my opinion. I am glad however, that I have found a use for it. Due it it's soft crayon texture, and it's fantastic blendability, I will certainly be using it as an eyeshadow rather than a liner from now on. This slight disappointment hasn't put me off, I would definitely be interested in trying more Daniel Sandler products in the future. 


Thankyou for reading,

E.


This product was sent for me to review. Hairtrade.com is one of the UK's leading online retailers of hair extensions, hair care and beauty products. You can order this product by clicking here.

Saturday, 1 June 2013

Model makeup #01

Evelyn so kindly included my blog in her '5 Blogs To Follow' feature earlier this week and in it she mentioned that she hopes I do more makeup artist related posts. I'm not sure whether many people are interested in this but I thought it couldn't hurt to do a 'trial post'. I thought a small behind the scenes type post about photoshoots I work on could be of interest to some of you if I tell you about the look I was going for and the products I used to achieve this. It's something a bit different and a lot more personal in one way, than I have included on my blog before. I try and keep work/blog/life as separate things but inevitably they will overlap at times :-) 
Anyway what I am getting at is feedback is appreciated! Let me know if you do or don't enjoy this post.


Instagram: @emilylaurenbeth
On Thursday I organised a beauty shoot with my photographer pal Lewis. One of the models, Naomi, is who I'm showing you today.
The vision of the shoot was just to experiment with vivid, vibrant colour. It was going to be beauty focused, (so mainly head shots with no attention to clothing or body poses) with a mainly editorial approach.

For one of the looks I decided to go all out. A test shoot is a perfect time to experiment with new ideas or techniques as it is a safe environment to learn. I decided to keep Naomi's skin fresh because she had these amazing freckles all over her face, so I made a tinted moisturiser just to even out any redness she had. I used Illamasqua Sealing Gel on powder eyeshadow 'Fame' to turn it into a liquid paste. Using an angled brush I filled her brows in with solid green colour!
Eyebrows have been 'on trend' in various forms (bushy, filled, feral) for a few years now, then there was the time Chanel hit the runways with amazing embellished brows. Many catwalk trends are unlikely to filter down to 'real people' but the element of the brow being a feature in day to day makeup definitely has. I love eyebrows and knew it was something I wanted to include in this shoot, so why not colour them in?

I created a simple contoured eye using NARS eyeshadow 'Abysinnia' and the Urban Decay Naked Basics palette, with eyeliner flicks using MAC gel liner in 'Blacktrack.' In hindsight I would have made them a bit bolder and thicker. 
At first I kept the lips bare and then for a few more shots I put MAC 'Vegas Volt' lipstick on her. You can see both looks in the instagram images above, let me know which one you think looks best.

I put her hair up in a bun and placed some fake flowers that I found in the studio in, I think it really helps make the photo and ties the overall look in together well. 

So there we are, a little behind the scenes summary of a recent test shoot. I think that Naomi did a great job considering she doesn't model very often, and Lewis did a good job of capturing my vision! Here is a final picture:


Lewis Hughes-Evans photography, Naomi Shalom model.
Thanks for reading,

E.

Wednesday, 6 March 2013

Midweek Post: My favourite eye makeup brushes.

There are a few brushes that I cannot imagine being without now, so I thought I had better share them with you so that you don't miss out too!


Real Techniques eyeshadow brush; This is a great eyeshadow brush for packing on the product. It's not too big which I find so many others to be, it is just the perfect size for my eyelids! This is made of synthetic hair so can be used with creams or powders, but I especially love it with powders because I think it picks up product so well.

MAC 217; This is often sold out on the website so you may have already gathered that it is a popular brush. This is a great brush for blending and adding product into the crease of the eye.It's tapered head means that it accesses the crease well without spreading the product over the lid. It also blends powders really well.

Illamasqua Blending Brush 1; This is great for blending eye makeup seamlessly. I always keep it clean and do not use it to apply product with, just swirl it over a smokey eye to blend the colours and fade. Like all the brushes at Illamasqua, it is synthetic hairs which I generally prefer to use.

Laura Mercier Smudge Brush; This is an absolute must have for smudging any under eye colour to create a more smokey or blended finish. It's a great size- it is small enough to be precise but wide enough to remain firm which is an important quality in any smudger brush. Works great with powder and pencil/gel eyeliners.

MAC 210; I have already spoken about this a couple of times before, for me it is a must have for applying gel eyeliner, whether it be for a winged flick or onto the water line. The only downside is that it has frayed slightly and I haven't had it a year yet.

Illamasqua Angled Brush; This is the best angled brush I have ever used for several reasons. Firslty, the brush is made of synthetic hair which makes it both cruelty free and multipurpose in terms of being able to use it with liquids, creams and powders. The length is perfect- it's as if Illamasqua have taken a standard angled brush and cut it in half, making it short and wide, therefore a lot firmer (perfect for creating straight lines or sculpted brows with ease) and alllowing more control as it isn't as flimsy. My brows have improved ten fold since I have been using this brush, the size is just perfect. Worth every penny.


Wednesday, 6 February 2013

Midweek Post: A Pop Of Colour


I must have been feeling a bit fruity last week when I decided that orange and blue in the same makeup look was going to be a good idea. In the end, I really liked the outcome and wearing a pop of colour during these dark winter (I am not a big fan of post- Christmas winter) days is a quick and an easy way to brighten up my mood. Orange and blue are complimentary colours and a couple of people made nice comments about my makeup that day, which is always nice isn't it?

I used the Urban Decay Naked Basics palette on my eyelids to create a natural brown look and then put Illamasqua's medium pencil in 'Debonair' under my waterline. I blended it with one of my Laura Mercier brushes and added a bit of brown from the UD palette in the outer corners to tie in the overall look. Granted, the medium pencil needed to be touched up throughout the day which was a bit of annoyance. On my lips I used a true vivid orange lipstick also from Illamasqua called 'Flare'. The formula is a little stiff but it is ultra matte and so was the perfect choice on a windy day! Nothing worse than hair getting stuck in lipgloss! 

I enjoyed wearing something a bit different and have been trying out different looks recently, I'll try and document a few of them for this ere blog :-)

P,S, Can you tell I still can't use my camera properly? ;-D


Sunday, 13 January 2013

Building my Makeup Artist Kit.


I thought I'd write a post to show you some bits I have picked up for my makeup kit. Some of you may know that I have been working on makeup counters in department stores for a while but I have decided to branch out into freelance artistry on the side because it's the creative aspect of makeup that interests me, not so much the retail/sales. I have always been fairly creative, I used to paint a lot and I studied a degree in Art History. I kind of fell into makeup but it's something I have a huge passion and inherent interest in (hence this blog, too!) so it makes sense to persue it and hopefully forge a career out of it.

I am booked into a makeup artistry course run by Louise Constad in April, the course includes a basic makeup kit so there are only a few bits I need to get to 'complete' it!

I recently left my job working for the Estee Lauder companies and thought I had better take advantage of my discount and place one last order to supplement any gaps in my future kit. I think the generous staff discount is the only part of the job I will miss! I decided to just order MAC items this time as they are reasonably priced, of good quality and are a brand I am very familiar with.

I ordered two brushes- the 210 eyeliner brush which is a staple in my personal makeup routine. It's very fine and works great with gel eyeliner or for precise detailing but to be honest you could buy fine paintbrushes from your local arts store for cheaper! I ordered the 188 Duo Fibre brush but I expected the head to be a bit larger. I noticed that there isn't a duo fibre included in Louise's kit and as I am so used to using brushes like this I thought it would add to the brush collection well.

I bought a Fluidline in 'Dipdown'. Louise provides us with the Fluidline in 'Blacktrack' so I thought it would be useful to get a dark brown gel liner as I use both shades regularly.

I bought 6 eyeshadows ready to pop into a pro palette, so I got some extras in shades I know and love and think will be useful. I bought 'Coppering' and 'Cranberry'- two of my favourites. They're so warm and unique. I got 'All The Glitters' as it would be a useful frost colour. 'Cork' and 'Omega'- two matte, natural earthy browns. 'Omega' is also great for filling in blonde brows. Then I got 'Sumptuous Olive' thrown in for good measure- a wearable, moss green.


So that's it so far! I bought a pill box from Muji to decant some lipsticks in. Would you be interested to see a post on that once I have done it? 

Please let me know if you like me including makeup artist related posts. 
What would be your kit essentials?


Wednesday, 19 December 2012

New In! Urban Decay Naked Basics Palette.

Urban Decay 'Naked Basics' Palette, £20 for 6 x 1.3g (7.8g) 


I knew I had to have this as soon as I saw it advertised (I think in a magazine?) so I placed an order for it the day it was made available. How keen is that? 
The palette is an online exclusive at Debenhams and luckily for me it was during megaweek so there was 10% off too aswell as free delivery.
I don't own the Naked or Naked2 palette, while they always tempted me I always thought that shimmery shadows from Urban Decay always created a bit too much fallout for my liking, but I was confident this wouldn't be the case with a palette of 6 matte shadows.

The packaging:
It's smaller and more compact than I thought it would be, which makes it perfect for travel. I don't think the presentation is particularly good- the pans never look very secure and you might be able to see on shade 'Faint' that it looks a bit faulty as if it could pop out any minute. I like the mirror inside which covers the entire lid and I like that it doesn't come with any brushes, as they are wasted on me (but would perhaps be helpful for others.) It is made of hard plastic which is fairly protective with a click-shut mechanism.

The shades:
Four of the shades in this are exclusive to the palette, which is nice, eh? Urban Decay describe them as 'must own' and I am inclined to agree. Neutral shade eyeshadows are a must have in any girls basic makeup collection. I'm also a firm believer that eveyone needs a good, matte black and this one contains it.

Left to right:

Venus: This one is more of a satin finish rather than matte, it's slightly frosted and is a good highlighter or used on the inner corners of the eyes to widen and brighten.

Foxy: A wearable, buttermilk shade which is good at neutralising discolouration on tired eyes. A good base for any day-to-day look.

Walk Of Shame: I am in love with this colour, a creamy pale pink, but when I say pink, I mean the faintest most delicate shade of pink. This will look great if any of you like a vintage look, as there's something quite fabulous and retro about it.

Naked2: A light brown that is very buildable, great used all over the eye for a grungry gothic look or used in the crease to define and shade.

Faint: A stunning taupey brown, can be used in a similar way to Naked2 but for a deeper, more dramatic effect.

Crave: A matte black, that is pretty black. Nothing more disappointing than a watery black, which are so common in palettes. Great to line with, define, or deepen the browns. This one is very buildable too, I've been able to get it quite intense.

Formula:
All of the shades are so silky to touch and really pigmented. They're not a bit chalky which is something some companies struggle with when creating matte eyeshadows. Worn with eye primer, the eyeshadows lasted a whole day and I experienced no creasing and minimum fade. This palette gets a thumbs up from me, I haven't put it down since it arrived.

Do you own any Urban Decay Palettes? Would a palette solely dedicated to matte shadows appeal to you?


Wednesday, 16 May 2012

Midweek post: Bobbi Brown Gel Liner

Bobbi Brown Long-Wear Gel Eyeliner, £16.50


I'd recently been reaching for my Maybelline Gel Liner more and more but after noticing that it was getting drier and harder to use each day I thought it time I bought a new one. I opted for a premium one as I was hoping the quality would be more satisfactory and as it's an item I use everyday it wasn't a problem paying more for it.

The gel is a soft and creamy formula that glides on so smoothly. The product screams quality and I'm not expecting this to dry out the same way the Maybelline one did (but I'll keep you posted.) It's jet black and it's not often you'll need two layers to achieve this effect, however it can also be applied thinly for a more subtle, off-black flick.

What has really impressed me about this product is it's staying power. I believe it is 'water resistant' (Bobbi Brown website) and so I have been applying it onto my waterline...sure enough it's still intact 6 hours later albeit slightly faded, but still there. For someone who is constantly frustrated by kohl liners slipping off the waterline to product those oh so sexy panda eyes, this product has been a real life saver. On the top lid this liner lasts all day, with no fade and no smudge- divine!

Overall I'd certainly recommend this product, I'm not an expert in gel liners yet, having only used three different ones (previously being a die hard liquid liner user) but the creamy consistency paired with excellent staying power means that I give it a big thumbs up, I'm unsurprised it has won so many beauty awards. 
It can be found on any Bobbi counter or under the 'Best Sellers' section of their website and is available in a whopping 13 shades- next on my hitlist is 'Black Mauve Shimmer' to put a bit of a spin on a classic.

What gel eyeliner do you use?


Sunday, 1 April 2012

My March Favourites!!

Hey all!
I'm here with my favourite and most cherished beauty products from the lovely month of March....


M.A.C 'Watch Me Simmer' Lipstick; This is the lipstick I've been picking up the most this month if I wanted statement lips! I love the shade. It's a super bright, amplified coral shade that develops more pink the longer it's on the lips (on first application it leans more red). The only downsides are that it does stain the lips. I picked this up when the Shop MAC Collection was exclusive to Selfridges, it has since been released in the rest of M.A.C. stockists and appears to have become quite popular! If you missed out the first time, don't fret, it's being repromoted in the 'Reel Sexy' collection being released in April. See full review here.


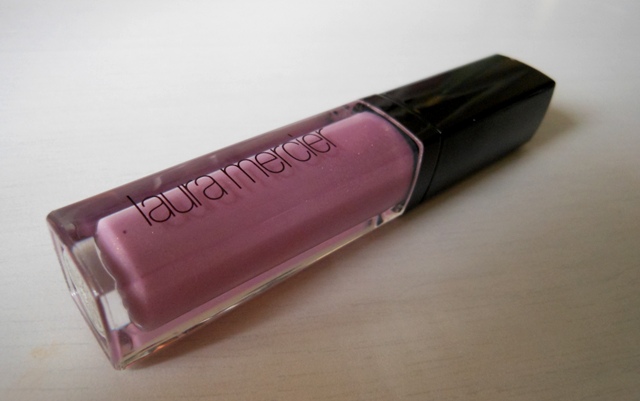
Laura Mercier lipgloss in 'Nude Lilac'; You may have seen this used in a couple of my FOTD's before but I've never really reviewed it. It isn't a particularly long- lasting gloss as it isn't a very wet formula, but I love the glaze it gives my lips, even if it is just for a temporary basis! The lilac colour in the tube doesn't transfer to the lips but the cool tones of it do, it's the perfect gloss if you're looking to tone down a bright colour underneath, used on it's own it will only add a subtle colourlss shine to the lips. There is some gold glitter running through it that does remain on the lips after it's dried up. Note that it has got a strong, deep vanilla scent. This gloss has been carried around with me in my bag and used on a daily basis...perfect for me trying a bit of a more toned down nude look this springtime! (Post Here.)


Blistex Relief Cream; Not a very exciting product but one I've been using on my lips before bed to restore them back to health! I think I must have gone overboard on lip products the last few months because my lips have been paying for it the last few weeks, they've been dry and flaky but this may also be due to seasonal changes, either way I've been applying this at night and taking it a bit easier on the lip products. It's really worked, especially over a period of time and my lips feel nourished and smooth once again! It's not like a lip balm that you can apply on the go, as it is a milky white texture that does take a while to soak into the lips- definitely a night time treatment particularly with its tingly menthol flavour!


M.A.C. 210 Brush; With this, I've finally found a suitable brush that is thin enough to apply gel eyeliner the way that I want! I've been using the Maybelline Gel Liner which I think is okay but I never got on with the accompanying brush (next on my list is the Clinique one when this runs or dries out) so I took it upon myself to get a brush to make applying gel liner a bit easier and a bit more enjoyable. It does the trick, it's a very thin brush but the hairs are dense enough that you can control application quite well. You can choose the thickness of the line you'd like to apply and it distributes product evenly.


YSL Eye makeup remover; I got this free in a makeup bag a few months ago because I'd bought a few products the counter lady threw this in, it was full of goodies and I was so happy because I really love Yves Saint Laurent! I use it sometimes at night if my eye makeup is being a pain to remove but I mainly use it on a cotton pad to quickly remove any products off makeup brushes. It's great to give the M.A.C. 210 a quick clean after use to avoid any gel liner drying onto it and going clumpy between deep cleans.


Benefit 'High Brow'; I know they've released their 'High Brow Glow' now but I'm still a big fan of the original. I feel naked if I don't wear this. Applied under the eyebrows, onto the brow bone, it adds the illusion of more refined brows, and a higher arch (something me and my brow- waxer have been working towards over the last 6 months!) so this helps give the illusion of that in the meanwhile. It's a 'linen pink' colour so it blends into pale skintones really well, and adds that extra highlight and dimension to perfect any eye look! Would really recommend this.


Sally Hansen Mega Shine Top Coat; This was recommended to me by Cara over at Cara's Beauty Blog and since purchasing it a week ago I've put it on top of every nail look I've painted and it has completely transformed the way my nails look! I have other topcoats, but I was after a really super-glossy supershine topcoat that was fast drying and wouldn't break the bank. It dries within a couple of minutes and leaves the nails looking professionally manicured! Thanks Cara!

There's my March favourites, I don't do these often so I hope you've enjoyed it. What have you been loving lately? Let me know! 


Friday, 21 October 2011

Eyeliner Review #1 Maybelline, M.A.C, Rimmel

Maybelline Eye Studio Lasting Drama Gel Liner £7.99
M.A.C. Superslick Liquid Eye Liner £15 for 1.8ml
Rimmel London £5.29 for 2.5ml
 

As promised in previous posts, I'm going to compare three different eyeliners, all of which you can create the winged flicks with, the makeup trend that I posted about here. Two are liquid liners and one is a gel liner.

1) Maybelline's gel liner caught my eye earlier this year because firstly I hadn't tried it before and secondly, it made a change to liquid liners. I had heard a couple of good things about it so bought it and gave it a try.

  • This pot of gel liner has so much product for the money you pay and will last you yonks.
  • The container it cute and small, and frosted glass- like! And it comes with a precision brush.
  • The gel liner is a good shade of black, but I find that it needs two coats to be jet black. I find this quite difficult, as the line always seems to thicken the second time and I don't always want this to happen!
  • I personally find the brush to be too thick and hard to control. It is especially difficult when using it on the inner corners of the eye, where you would want a thinner line (ready to graduate to thicker once gliding it accross the lid). It really depends on how steady my hand is that day and if I have the patience to try this product, as it does take a lot longer to apply than a liquid liner. 
  • It has pretty good lasting power.

The gel liner does give a nice effect, it is more soft focus than a hard line. It does seem to fade throughout the day, not too drastically though and I'm sure this might be prevented through wearing an eye lid primer.
I think this product's success is down to personal preference for how you like to apply your eyeliner and how thick you like your lines and flicks to be. I think I'll be trying this out more; I used it for a couple of weeks and put it aside, some mornings I find the brush and the pot too fiddly and time consuming. Practice makes perfick though, I suppose!

2) One of my most disappointing purchases from M.A.C. I even repurchased when the first one ran out thinking maybe the one I'd had previously had been a dodgy one. No such luck, the finish and colour pigmentation is terrible for the price, the lasting power even worse, shame!
  • Superslick eye liner is supposed to leave a wet look finish. It does leave a slight glossy finish. 
  • The colour is more of a charcoal- grey than a black, which is fine if you want a more subtle or natural look.
  • The brush is my favourite part, it is thin and precise which means excellent control over how thick you want the line to be, also means a perfect flick, there's less room for mistakes to be made with this brush.
  • Only hours after application the eye liner fades dramatically, it smudges and rubs off a bit too easily, a definate disadvantage.

These photos were taken about an hour after application, as you can see there is clear fading already happening [ :-( ]. I'd recommend this product if you're looking for a precise brush and therefore a precise/thin/subtle line, but be prepared to reapply throughout your day.

3) I bought this Rimmel eyeliner partly because I was broke, needed a liquid eyeliner and it was cheap, and partly because I had read pretty impressive reviews. I must say, I think this is my favourite of the three, I pick this one up before the other two when I'm applying my makeup in the mornings.
  • The brush is slightly fatter than the M.A.C. one so it is a bit harder to apply such a precise or thinner line, but the pigmentation is fab. 
  • The formula is slightly watery and can take a couple of minutes to dry, but this is common amongst wet cosmetics such as liquid eyeliner. It can rub off quite easily, but in comparison the previous M.A.C. one this one has excellent staying power. I can complete a 9hr shift at work and still have a clear line and flick by the end of it.
  • It can take two coats, but this is easily achievable with liquid eyeliner. I only struggle to go over lines with the gel liner.

Eyeliner really is one of those personal choices every girl makes because every girl wants something different from an eyeliner, from price, to finish, to overall look. I hope these mini reviews help at least one of you out there to make a decision though! :-)
Top; Maybelline. Middle; M.A.C. Bottom; Rimmel
What eyeliner do you use? Do you have any products where you pick the 'drugstore' brands over the more high end brands?